Last week I finished the undercarriage, a.k.a. landing gear a.k.a. wheels:

The wheel well doors are white inside, so I bought a paint pen
and then I bought a black one as well for various other parts.
The doors are edged in black, though it's a lot thicker and sloppier
than I intended. The whole thing stinks. Compare with
Swanny's Models.
Here's a picture of the completed aircraft. It still needs decalling, spraying, and
under-wing stores:

I put it outside for spraying with Testor's Glosscote.
Then I found out that some areas were unpainted.
But that only showed up in the photographs, and it looks ugly.


The point is to spray it with Glosscote
to get a smooth and glossy finish, to which the decals
will adhere well.
Also the decal film becomes invisible.
After decalling the whole thing should be sprayed with...
I'm not sure, Glosscote or Dullcote.
Then I'll give it a wash like it says on
Swanny's page.
Update: Just fixing typing errors.
Last updated: Jun 19 2005 22:40
Just a bunch of pieces lying around waiting for paint, and ordnance half-way through painting:


I'm just not very good at painting.
The F14 was a fluke, and not a very good one.
All my paint has separated into oil and pigment layers,
and eitehr I get thin thinner that just wets and gives a mild version of
the base color,
or gives me a gob of pigment that either dries in a thick skin
with bubbles, or clumps.
I can't get the white paint to spread right,
it runs.
The light ghost gray areas
(most of the model)
are barely satisfactory, and the black's too matte.
Hmm, actually, the ghost gray will probably be okay after drying.
I applied it with lots of strokes, so it streaked but at least it was thin
but not too thin.
But the streaks go away when it dries
-- if it was the right consistency to begin with.
Now glue, that I've got down.
I'm a long way from the days of slathering Stikfast on every surface.
Just a dab of testors cement is enough.
I thought the tube stuff sucked,
but for anything bigger than the teeniest parts,
it's better than the liquid cement
-- you can't get enough of that for spreading around a bit.
Besides, the liquid stuff dries too fast to spread on a large area.
(Actually, it softens the plastic and then hardens it again when it dries.)
The tube goo is nice for spreading around without loss of drying time.
It gets tacky soon enough, but not too soon.
The kit comes with Sidewinders and HARMs.
The Sidewinders are one-piece, but the HARMs come in halves
(cut along the long axis)
just like the external fuel tanks --
the tanks by the way are a pain to glue correctly.
They also have these extra fins that you have to attach
(see full-size picture),
which helps raise the parts count.
I do see how it's easier to mould the halves and the fins separately.
The Sidewinders are relatively small and can be molded in one piece.
My file array is a nice way to hold things like this upright.
|

|
|
The air intakes and pod mounts were attached.
The inside of the scoops
should be insignia white according to the booklet.
The booklet doesn't say, but I think the
back of the intakes,
corresponding to the turbines(?),
should be painted dark gray or black.
|

|

|
The "pod mount fairings" are glued to the bottom edge of the body.
They can hold missiles (not included in this kit)
or Forward-Looking InfraRed (FLIR) and Laser Detection and Tracking (LDT)
pods. Whatever.
|
Last updated: Mar 06 2005 22:00
Here's a shot of the horizontal stabilisers.
First you glue them, then you have to hold them in place
for 3 hours.
Not! You use stacks of coins and a fairly horizontal surface
and leave it overnight.
Think of it like a car up on blocks.
The horiz stabilisers contain one set of control surfaces -- the elevators.
(I'm not an aeronautical engineer, nor do I play one on TV or the internet.)
|

|
I completed the nose section a few days ago.
There's a little paint leakage, but otehrwise it's okay.
The top and bottom halves are being glued in this picture;
hence the rubber band, which keeps pressure on them.
I should note that all these pictures are click-able,
and each one takes you to a larger sized version in my
album or gallery,
which also contains other picture that may not be on this page.
|

|
|
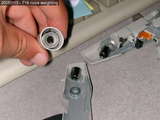
In most models of modern aircraft, the nose must be weighted with
bits of scrap metal. Otherwise, the model tends to tip over
backward because the tail is heavier than the nose. This isn't a
problem in real aircraft, though I bet they sit pretty light on the
nose gear.
I usually forget this step in most of my models. The B25
(assembled and re-assembled many times) always had this problem,
and I eventually stuffed the nose with magnets. I think I had to
take the F14's nose apart and do over.
|
In this case, I inserted several left-over nails in the nose cone. I was going
to put 2 large screws in front of the cockpit, but I figured those were still
good for something. I remembered I had kept some bicycle brake spacers for
precisely such a purpose, so I threw several of those in there. I poured a lot
of
Testors
cement over the lot. After asssembling
the nose halves, I added more spacers (I've gone through several brake pads in
the first year of owning this bike) in the space in front of the forward
control panel.
The kit can be built in various ways: single seat or two seat trainer (I opt
for the trainer, for kicks), and the USN or Canadian version. I'm not sure, but
I think I'll stick with the USN to match the F14. Or maybe I'll do my own thing
-- which includes painting it a uniform light ghost gray just like the Tomcat.
Skills? I got none.
|
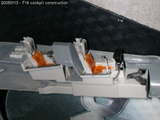
The first thing to do in these kits is to build the cockpit. In the F18 model,
the cockpit sits on top of the nose gear bay. I painted the seats earth brown
instead of the recommended olive drab, and highlighted the controls with
anthracite gray metallic (left over from the abortive attempt to paint the
NY Central Hudson model)
instead of black. The cockpit interior is dark gull gray and "basic plastic gray".
|
|
Last updated: Mar 06 2005 15:24
I'm turning what used to be a web page into the
F18 blog category.
The first 3 entries were probably written about January 2005.
|
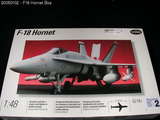
I saw this kit at the hobby shop, and it was fairly cheap and I have an
F14 Tomcat
in the same scale, so I thought I'd give it a shot. |
|
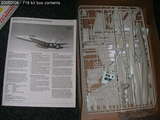
The box contains the usual stuff,
instruction booklet, parts trees, decal sheet.
The detailed instruction booklet
includes a short history and specification page as well as an introduction to
weathering. |
|
Last updated: Mar 06 2005 15:23
|
- Oldest first
- RSS feed
- Livejournal
- Friends
|


